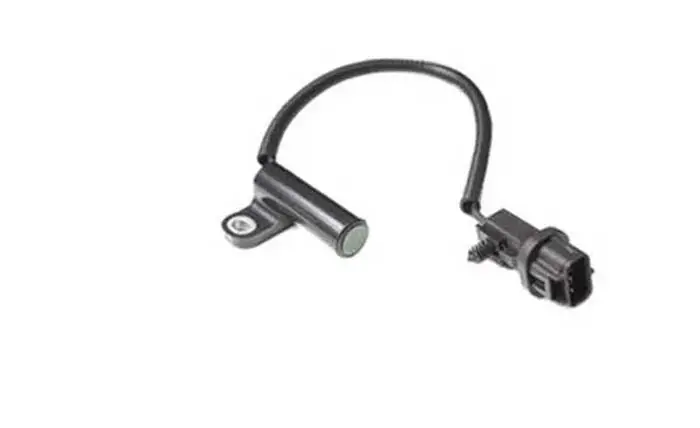
A crankshaft position sensor is a crucial component in any vehicle with an internal combustion engine. It is a device used in an internal combustion engine to monitor the rotational speed of the crankshaft. It measures the exact position of the engine crankshaft as you crank the engine and performs many important functions in a vehicle, such as deciding the timing and amount of fuel injection into the vehicle’s combustion chamber.
A bad crankshaft position sensor causes various issues with the engine performance, such as misfires, stalling, or difficulty starting the vehicle. It is important to regularly test your crankshaft to ensure that it is in good working condition. Testing your crankshaft sensor with a multimeter is a quick and easy way to diagnose potential issues with your engine’s starting system.
By following the simple steps outlined in this article, you can ensure that your sensor is functioning properly and avoid potential engine problems. In this powerful guide, you will learn how to test the crankshaft position sensor.
What is Crankshaft Position Sensor
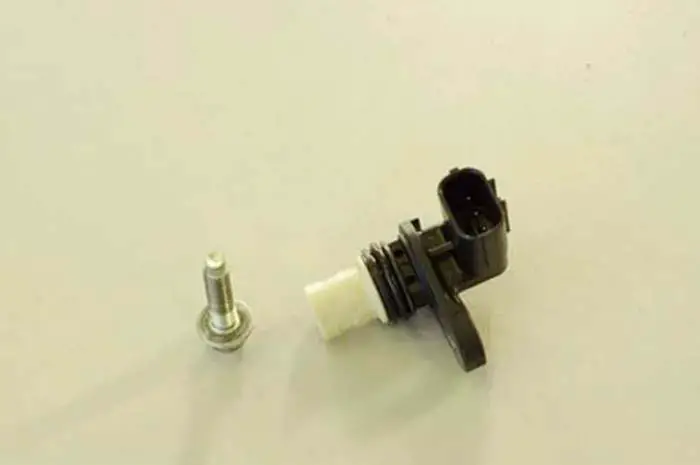
A crankshaft position sensor, commonly abbreviated as CKP sensor, is an electronic device used in internal combustion engines, whether petrol or diesel. Its primary function is to monitor the position of the crankshaft.
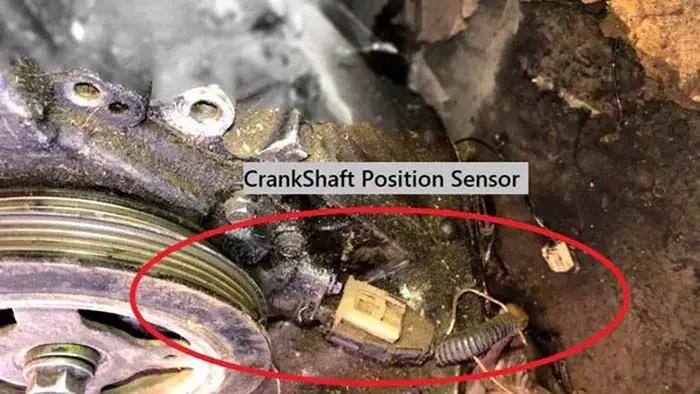
This crank position sensor controls ignition timing detects RPM and calculates relative engine speed. The sensor is typically installed near the flywheel ring gear and measures the rotation speed (RPMs) and the precise position of the engine crankshaft.
How To Test Crankshaft Position Sensor With Multimeter
Testing the crank sensor with a multimeter is an essential skill for any aspiring mechanic or DIYer. This article will provide step-by-step instructions on how to test the integrity of your crankshaft position sensor.
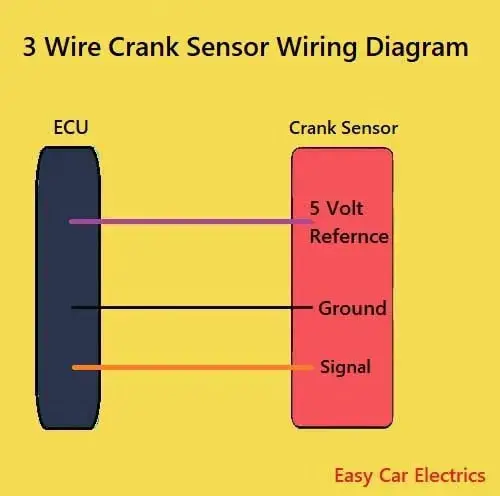
There are two most common types of crankshaft position sensors, inductive and hall-effect. The inductive or pick-up crank sensors have two wires while the hall-effect crank sensors have three wires. Below is the step-by-step procedure for testing inductive and hall-effect-type crank sensors.
Below is the procedure for two and three-wire crankshaft position sensor testing with a multimeter.
Symptoms Of Crankshaft Position Sensor
- Illuminated Check Engine Light: A faulty crank sensor can trigger the check engine light to turn on.
- Engine Vibration Issues: The engine may vibrate excessively due to the misfiring of cylinders caused by a failing crankshaft position sensor.
- Acceleration Problems: A faulty sensor would possibly lead to sluggish acceleration and even lead to a complete engine cut-off.
- Intermittent Stalling: A failing sensor would possibly cause intermittent stalling or engine cut-off.
- Poor Fuel Economy: A malfunctioning crankshaft position sensor may significantly affect fuel economy, increasing fuel consumption.
- Hard Starting: The engine may experience difficulty in starting, leading to a long cranking time or even total failure to start.
In conclusion, a faulty crankshaft position sensor would possibly cause a range of problems that can impact the driveability of a vehicle. It is important to recognize the symptoms early and replace the sensor promptly to avoid any safety hazards and prevent further damage to the vehicle.
Related Post: Top 7 Symptoms Of A Bad Crankshaft Position Sensor
How To Test 2 Wire Crankshaft Position Sensor With Multimeter
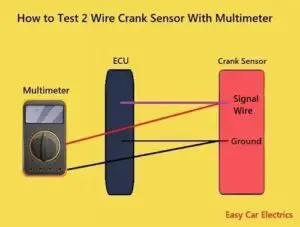
The inductive or magnetic pick-up crank sensors have two wires. Here is the method of testing a 2 wire crankshaft position sensor is as given below:
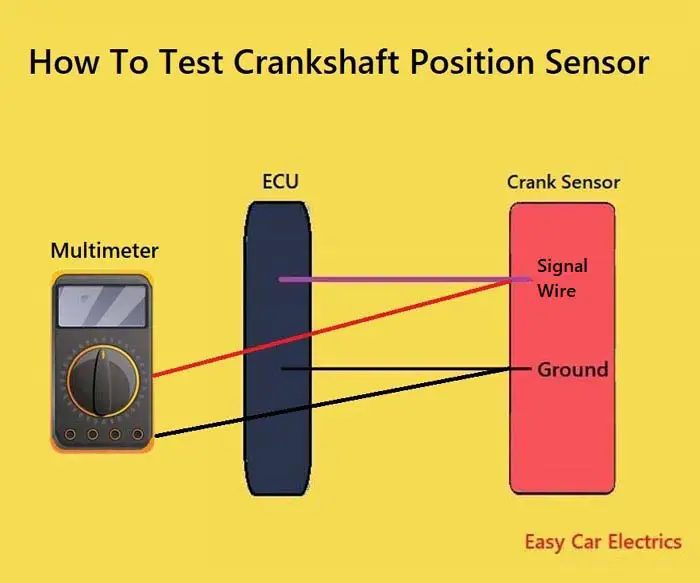
- Set the DMM to DC voltage settings of a low range.
- Start the engine of the vehicle ON.
- Identify the signal wire of the circuit to check the presence of power in the wire.
- Connect the red cable of the DMM to the signal wire of the sensor’s circuit and the black multimeter lead to the ground wire of the crank sensor to check the voltage of the crank sensor. Look at the multimeter readings, If no reading is showing, then the circuit of the sensor has failed.
- Commonly you will get any reading between 0.3 volts to 1.5 volts.
- If the signal or the reading is zero then the Crankshaft Position Sensor is faulty.
- You can also check the resistance of the sensor by putting the DMM knob to the ohm scale and connecting both leads of the DMM to the crank sensor wires.
- You will get a resistance reading of the crank position sensor between 200 and 2000 ohms. You can find the specific reading of your car in the repair manual.
How To Test 3 Wire Crank Sensor With Multimeter
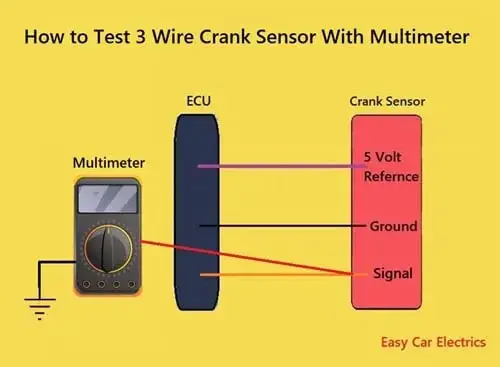
Accurately testing a 3-wire crank sensor with a multimeter is an important step in ensuring your vehicle is running smoothly and efficiently. Whether you are troubleshooting a bad crank sensor or simply checking for normal operation, It is essential to take proper precautions when handling a crank sensor.
The hall-effect type crank sensors have three wires. Here is the way to test a 3 wire crank sensor with a multimeter as given below:
- Use the vehicle’s repair manual to locate the ground, reference volt, and signal wires among the three-wire Crankshaft Sensor.
- Convert the settings of the Digital Multimeter to Direct Current Voltage.
- Turn the ignition switch of the vehicle ON without turning the engine of the vehicle on.
- Connect the red lead of the Digital Multimeter to the reference wire of the sensor. Similarly, connect the other lead of the multimeter to the ground wire of the sensor. You will see 5, 7, or 12 reference volts depending upon the car. It means your ground and reference volt wires are Ok.
- Then start the engine of the vehicle.
- Connect the red lead of the Digital Multimeter to the Signal wire of the Crankshaft Position Sensor and the black or negative lead to the ground terminal of the battery. You will gain approximately 300 millivolts.
- Compare the obtained readings with the ones present in the manual. If the obtained readings are lower than the given readings or if the obtained reading is 0, then your sensor is defective.
- Remove the sensor from the harness and check for any physical contamination of the sensor.
Related Post: 2& 3 Wire Crank Sensor Wiring Diagram: W/Pics
How Do You Reset a Crank Sensor without A Scanner
Without the aid of a diagnostic tool, like a scan tool or diagnostic scan interface, it’s typically impossible to reset the bad sensor. Such tools are created exclusively to establish communication with a vehicle’s engine control unit (ECU), allowing for engine and system issues to be diagnosed and troubleshooted. An ECU access via a diagnostic tool is necessitated in resetting the crank sensor.
If you don’t have access to a diagnostic tool, you can reset the check engine light (CEL) by disconnecting the battery. This will clear any remaining electricity from the system and might reset the CEL. However, it won’t actually solve any underlying issues related to the crank sensor.
If your CEL comes back on after performing this procedure, it’s probable that there’s an issue with your crank sensor or another engine system component that demands attention. In this scenario, it’s better to seek help from a skilled mechanic with diagnostic tools who can identify and fix the problem.
Can You Reset a Crankshaft Position (CKP) Sensor
Resetting a crankshaft position sensor is typically not an option. This device detects the location and speed of the crankshaft and sends that information to the engine control unit (ECU). If the sensor fails, it can disrupt engine performance by sending inaccurate data to the ECU.
If the crank sensor isn’t working correctly, it may require replacement. However, there are instances where a broken crankshaft position sensor can be mended, but this is subject to a particular problem with the sensor. Usually, it’s not advisable to attempt resetting or repairing a crankshaft position sensor as it could need specialized equipment and expertise to do it appropriately.
Checking if the Camshaft Position Sensor is Bad
A failing camshaft position sensor would possibly lead to a number of issues with your vehicle. If you suspect that your camshaft sensor is bad, you may experience engine misfires, stalling or hesitation when accelerating, and poor fuel economy.
It is important to address a faulty camshaft position sensor. As soon as the camshaft position is identified as the source of the issue, it is important to take action to replace the sensor. If the check engine light in your vehicle is illuminated, the camshaft position sensor would possibly be failing and the sensor needs to be replaced. there are a few symptoms that you can look for to confirm your suspicions. Some common signs of a faulty camshaft sensor include:
- Engine misfires
- Stalling or hesitation when accelerating
- Poor fuel economy
- Check engine light is illuminated
In order to verify whether the camshaft sensor is the source of these difficulties, it is necessary to employ a diagnostic instrument that detects error codes. If the tool denotes that it is responsible for the issue, the cam position sensor should be replaced.
If you are not confident enough to carry out this task independently, you can seek assistance from a mechanic or service manual particular to your vehicle’s brand and model. They will assist you with replacing the camshaft sensor and ensuring that your vehicle is operational again.
Conclusion
In conclusion, testing a 2 or 3 wire sensor with a multimeter is a simple process if you follow the right steps. With this simple test, you can quickly determine if the sensor needs to be replaced or if it’s still good. When testing the camshaft position sensor, it is recommended to check the wiring harness for any loose or damaged wires. They must also ensure that the sensor wires are not touching spark plug wires or ignition coils to avoid any interference with the sensor’s readings. Finally, if you are unsure about the performance of your crank sensor, it is best to consult a professional mechanic for further assistance. With these steps, you can ensure that your car works efficiently and reliably.
FAQs
Changing a crankshaft sensor can be a challenging task, especially if you are not experienced with automotive repair. It usually requires disassembling part of the engine to access the sensor, which can be difficult to reach in some vehicles. You will need a variety of tools, including wrenches, sockets, and a screwdriver, as well as a replacement sensor.
If you are not comfortable working on your vehicle or do not have the necessary tools and knowledge, it may be best to have a professional mechanic handle the job. However, if you are handy with cars and are willing to invest the time and effort, it is possible to change a crankshaft sensor yourself with the help of a service manual or online resources.
To test the sensor with a multimeter, you can measure the voltage output of the sensor while it is connected to the wire. The voltage output of a crank sensor can vary depending on the type and make of the sensor.
Usually, a properly functioning crank sensor produces a voltage that falls between 0.5 and 1.5 volts. Nonetheless, it is critical to consult the manufacturer’s guidelines for the specific sensor being utilized to establish the anticipated voltage range. Additionally, it is worthwhile to remember that the voltage produced by a crank sensor may fluctuate within an acceptable range due to various factors such as engine speed, load, and temperature during normal operation.
Sign Up