Do you want to know how to wire a starter solenoid? Find out here!
The starter solenoid is a switch that is used to engage the starter motor in order to start the engine. The solenoid is usually located near the battery and is activated when the key is turned to the “start” position. The solenoid uses electrical current from the battery to close the circuit and engage the starter motor.
In a car, it is used to generate the magnetic field needed to turn the starter motor. The starter motor is what starts the engine by rotating the crankshaft. Installing the circuit for the starter is not a difficult task to do. However, it is important to remember to follow the proper safety precautions and to consult with a professional, if you are unsure of anything. With a little time and patience, anyone can wire a starter and get their car up and running in no time.
If you’re wondering how to install the circuit for the starter solenoid, wonder no more! This helpful guide will walk you through the entire process, step by step.
Understanding the Starter Solenoid Wiring Diagram

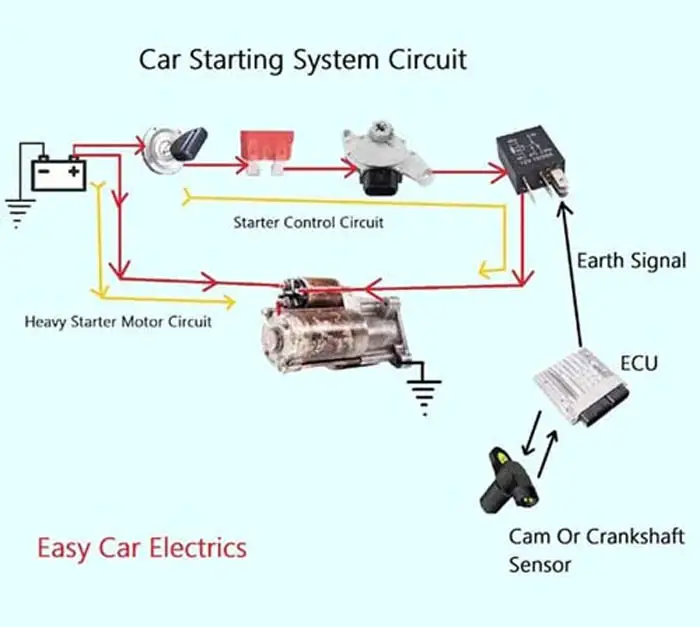
ples of electromagnetism in its work. When the ignition key is turned on, it sends an electrical signal to the solenoid, which then engages the starter motor and cranks the engine.
It act as safety solenoid switch, preventing the starter motor from engaging unless the transmission is in neutral or park. It act as neutral safety switch. Most people don’t know the difference between the starter control and the solenoid and often use them interchangeably.
The starter motor is used to crank the engine of the vehicle whereas the solenoid is a small cylindrical component that is responsible for connecting and disconnecting the starter motor turns and the battery terminal of the vehicle.

A three-pole starter consists of three terminals of the solenoid, one of them has a small terminal of pin-type, called the “S” terminal, and the other two terminals are thick bolt-type connections. The “S” terminal connects the ignition switch to the starter.
The solenoid has two thicker connections/terminals, one terminal works as the input power source and connects directly to the positive battery cable, and the other terminal works as an output connection and goes to the starter motor assembly.
Related Post: Starter Solenoid Wiring Diagram: 3 Pole Starter Diagram
The Importance of a Starter Solenoid
The solenoid is an important part of a vehicle’s starting system. It efficiently engages the starter motor, protects it from damage, ensures safety, and helps to prolong the life of the electrical system. If you have issues with your solenoid, it’s important to have it checked and repaired by a professional mechanic or electrician.
Precautions to Take
When working on any electrical system, it’s important to take certain precautions to avoid injury or damage to the vehicle. Here are some precautions you should take when going to the starter solenoid:
- Always disconnect the battery before working on the electrical system.
- Wear gloves and safety glasses to protect your hands and eyes from electrical shock.
- Make sure the vehicle is in park or neutral before attempting to engine start.
- Double-check all connections before reconnecting the battery.
What Gauge Wire for Starter Solenoid
The appropriate gauge wire for a car’s starter is reliant upon the starter motor’s amperage. Generally, a 12-gauge suffices for most starter motors found in automobiles. Nevertheless, if a high-performance motor is in use, a more substantial gauge may be necessary.
To determine the appropriate gauge for your specific starter, it is of paramount importance to consult the manufacturer’s specifications. Using an excessively thin cable could result in overheating and damage it. Meanwhile, utilizing a cable that is excessively thick could lead to needless expenditure on cable.
3. Tools Required
- Tools RequiredTo install a starter, you will need the following tools:
- Socket set
- Wrench set
- Screwdrivers
- Wire stripper/cutter
- Electrical tape
Wire A Starter Solenoid: Step-By-Step
Following are the steps to wire the on-starter solenoid in five minutes. It is very easy.
- Disconnect the negative battery terminal.
- You should lift the car using a jack under the vehicle and raise it. You might have to wire the solenoid from underneath the vehicle depending on the make and model of your vehicle.
- Place the starter close to the mounting bracket on the engine of your vehicle.
- Connect the battery’s positive terminal to the thick bolt on the solenoid with the help of a ratchet (This connection is usually labeled “BATT” or “+.”). Similarly, connect one ignition switch hot wire to the smaller terminal of pin type just underneath the bigger bolt (This connection is usually labeled “S” or “ST.”).
- Ensure that all the wires are connected properly, and after that, you must mount the starter on the engine. Once the solenoid is mounted you can reconnect the black wire to the negative terminal of the battery to re-establish the connection.
And Done. You have successfully wired the starter in a few minutes.
The below video’s explanation is not in English, but you can take an idea from it visually.
Common Mistakes to Avoid When Wiring a Starter Solenoid Relay
When installing the wiring for the starter, there are a few common mistakes that people make. These mistakes can result in a malfunctioning starter or even damage to the vehicle’s electrical system. Here are some mistakes to avoid:
- Incorrect Wiring: One of the most common mistakes is wiring the solenoid incorrectly. Each wire is usually connected to the correct terminal marked on the solenoid. If it is connected incorrectly, the starter may not engage or could potentially short circuit.
- Using the Wrong Size Wire: It’s important to use the correct gauge when connecting the starter circuit. Using a wire that is too thin can result in overheating and potential fire hazards. On the other hand, using a cable that is too thick can be difficult to work with and may not fit in the starter properly.
- Not Tightening Connections: Another common mistake is not tightening the connections properly. Loose connections can cause a variety of problems, including intermittent starting, voltage drop, and excessive heat. Use a torque wrench or pliers to ensure that all connections are tight and secure.
- Forgetting to Use a Fuse: When connecting the solenoid directly to the positive wire from the battery, it’s important to use a fuse or circuit breaker to protect the system from overload. This will prevent damage to the starter cables, or other electrical components in the vehicle.
- Not Testing the System: After installing the circuit for the starter, it’s important to test the system before reconnecting the battery. Use a test light or multimeter to check for voltage and continuity in each wire. This will ensure that the starting system works and help prevent any future problems.
By avoiding these common mistakes, you can ensure that your solenoid is wired correctly and will function reliably. If you’re unsure about any aspect of the installation process, consult a professional mechanic or electrician.
Tips for Troubleshooting Starter Solenoid Wiring Issues
If you’re experiencing issues with your starter wiring, there are a few things you can do to troubleshoot the problem. Here are some tips:
- Check the Battery: The first thing to check is the battery. Make sure it’s fully charged and has a voltage of at least 12.6 volts. If the battery is low or dead, it can cause problems with the starter.
- Inspect the Wiring: Check the cables from the battery to the starter for any signs of damage, such as corrosion or frayed cords. Repair or replace any damaged cables as necessary.
- Check the Solenoid Connections: Inspect the connections at the starter to make sure they’re tight and secure. Loose connections can cause the solenoid to malfunction.
- Test the Solenoid: Use a multimeter to test the solenoid for continuity and voltage. If there is no continuity or voltage, the solenoid may need to be replaced.
- Check the Starter: If the solenoid tests fine, check the starter itself. Make sure the starter is properly connected and the wiring is in good condition. If the starter is defective, it may need to be replaced.
- Check the Ignition Switch: If the starter and solenoid are working properly, the issue may be with the starter switch. Check the electrical connection at the starter switch and determine if there is a need to replace it.
By following these tips, you can troubleshoot starter wiring issues and identify the root cause of the problem. If you’re unsure about any aspect of the troubleshooting process, consult a professional mechanic or electrician.
Conclusion
In conclusion, connecting a starter circuit is a straightforward process that can be completed in just a few minutes. However, it is important to understand the function of the solenoid and to take proper safety precautions to avoid injury or damage to the vehicle. This article has provided a step-by-step guide for connecting the starter circuit, along with important information on the function and importance of this component. By following these instructions and taking the necessary precautions, anyone can connect the starter circuit and get their vehicle up and running in no time.
FAQs
A starter relay is an electromagnetic switch that connects the battery’s high current to the starter’s field coil and armature when the ignition key is turned to start the engine.
When the starter switch is turned to the start position, a control wire connects the solenoid directly to the battery’s large terminal. The solenoid’s plunger pulls the solenoid, which causes the armature to spin. The armature winding and insulated brushes ride on the commutator, causing the starter’s pinion gear to turn, which turns the engine’s flywheel.
A jumper wire is used to bypass the car’s starter switch and connect the starter directly. This is useful for diagnosing a starter system that won’t start due to a faulty ignition switch.
A ballast resistor is a resistor that is connected to one small terminal of the ignition coil. Its role is to reduce the current passing through the ignition coil field coil and armature, allowing the coil to operate for longer periods without overheating.
The 4-pole starter solenoid has four terminals instead of two, and it includes a lever fork that controls a one-way clutch. The lever fork engages the clutch, which turns the pinion gear to engage with the engine’s flywheel. One of the big terminals is connected to the battery’s ground wire, which provides a return path for the current flow.
Sign Up