A car starter motor is an electrical device used to start the engine. It works by converting electrical energy to mechanical energy. If you want to learn how to test a starter motor, you’ll easily find out here!
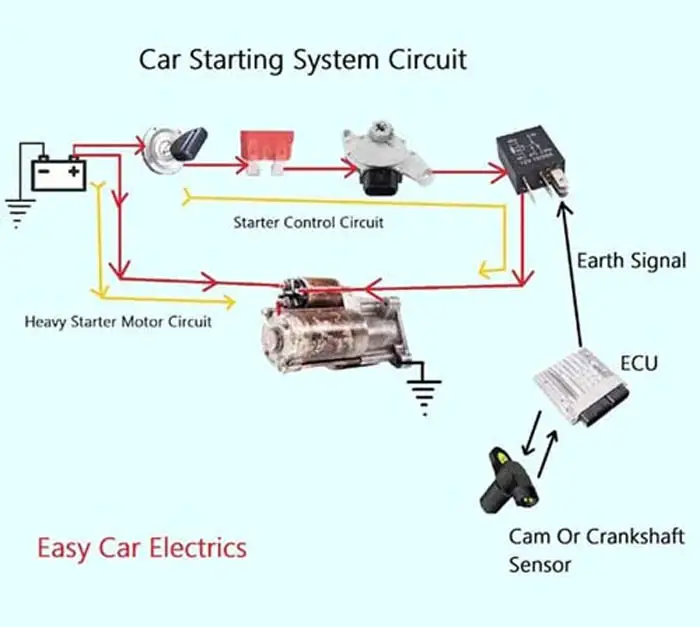
The car starting system operates the starter motor to crank the engine. A Starter consists of two parts, a solenoid, and a starter motor. The solenoid is an accessory placed on the top of the starter motor assembly that works as a relay to connect and disconnect the starter motor from the car battery.
The starter motor assembly creates a large amount of torque to spin the flywheel to start the engine. If a car engine does not crank due to a starter. It means the starter has a problem. To find out the problem, the starter motor must be tested.
Related Post: How to Test 2 & 3 Wire Camshaft Position Sensor With Multimeter
How to Test a Starter Motor with Multimeter without Removing it

The car starting system can have many problems. You cannot consider the same problem for the same reason. A car starter motor can give the same problem for multiple reasons. To find the exact problem, the starter motor must be tested properly.
Below are the procedure and step-by-step tutorial on how to check if the starter is bad without removing it, when it is not cranking.
Normally, when you want to crank the car and hear nothing, it might be due to the following reasons.
- Dead Starter Motor
- Blown Fuse or Relay
- Dead Battery
- Corroded Terminals or cut in the Starting Circuit
- Neutral Safety Switch
- Anti-Theft Immobilizer
Related Post: The Ultimate Guide To Car Fuse: What it is & How it Works

Before we troubleshoot the starter motor, it is important to check the starter motor fuse and relay. A blown fuse and relay can prevent the starter motor from running. Similarly, observe the battery condition and corroded terminal. A fully charged battery is considered 12.6 or higher volts. A lower battery charge or corroded terminal can also be the reason for not cranking the starter motor.
Furthermore, a bad neutral safety switch or anti-theft immobilizer does not let the current flow to the starter motor. So, here you have checked all the factors, and we assume that all the factors are correct and fine without the starter motor. Now it is time for the starter motor to be tested without removing it.
Before we go ahead and start troubleshooting, it is important to acquire safety precautions. Keep loose clothing and long hair away from moving parts, and don’t allow the children near the car while working.
Tool You Need
We require a digital voltmeter or test lamp to check the starter motor.
Step 1. Check The Voltage At Solenoid Control Terminal

First of all, check for the voltage with a voltmeter at the smaller control “S” terminal on the solenoid.

Turn the multimeter indicator to the volt mode of the 20v scale, and place the black lead of the voltmeter on the case of the starter motor, and the red lead probe on the solenoid control terminal.
When you turn the ignition key to the start position, there should be voltage present at the ignition switch control terminal.
If not, then check for the following components.
- Solenoid control circuit
- Starter fuse
- Starter relay
- Ignition switch
- Neutral safety switch
- Anti-theft immobilizer
Related Post: 6 Complete Starter Solenoid Parts, Functions & Working
Step 2. Check The Voltage At The Solenoid Feed Terminal

Now put the same red lead of the voltmeter on the solenoid feed terminal (input heavy terminal), and the black lead still remains the same on the starter motor case.
You will measure the full battery continuous voltage on the solenoid feed terminal, which comes directly from the battery positive power source or some vehicles use a heavy large-size fuse.
If the 12-volt power source does not reach the solenoid feed terminal, then check for the following components.
- Lose connections
- Break in the cable
Related Post: How To Wire A Starter Solenoid In 5 Min (With Diagram)
Step 3. Check The Voltage At The Solenoid Output Terminal

In this final step, you have to check the voltage of the solenoid output terminal.
Have a helper turn the ignition key and look at the solenoid output terminal voltage. It should be a full battery voltage. The feed and output terminals work as a bridge that transfers the voltage from the battery to the starter motor. Now here is the possible interpretation of the outcome.
Possible Outcome No 1
If the voltmeter gives the reading of full battery voltage at the solenoid output terminal it means the solenoid is fine. Because the solenoid transfers the current from the solenoid feed (Input) terminal to the output terminal.
If the voltmeter does not give the full reading voltage at the solenoid output terminal, it means the solenoid is bad and needs replacement.
Possible Outcome No 2
Now, while a 12-volt battery power source is present at the solenoid output terminal, the starter motor should spin, so it means the starter motor assembly is ok.
But if the starter motor does not rotate despite the solenoid output terminal receiving the current, so it indicates a dead starter motor and you have to fully remove the starter motor from the vehicle. Thus, in this way, you can troubleshoot a starter motor not cranking by using a voltmeter.
You can also safely use a test lamp instead of a voltmeter if a voltmeter is not available. I will not increase the word count of my article by repeating the above steps with the replacement of the word test lamp instead of voltmeter.
The steps and procedure of troubleshooting a starter motor by using a test lamp are the same as using a voltmeter. In the above steps, you can simply replace the test lamp instead of the voltmeter, and repeat the steps. It is simple. It is not rocket science. Don’t be overwhelmed.
The below video explains the testing procedure for the starter without removing it but with jumper cables not with a multimeter. I have not found testing the starter with a multimeter without removing it.
Sign Up